Using PhpMyAdmin To Export/Import Database

Managing MySQL databases is a common task when maintaining websites or applications. phpMyAdmin provides an easy‑to‑use web interface for exporting, importing, and running SQL queries without needing command‑line access.
This guide walks you through:
- Exporting a database
- Importing a database
- Running SQL queries in phpMyAdmin
Accessing phpMyAdmin
You can usually access phpMyAdmin through your hosting control panel (e.g., cPanel, Plesk, or Scout Control Panel hosting dashboard).
1. How to Export a Database in phpMyAdmin
Exporting a database creates a .sql file that you can download and store as a backup or migrate to another server.
Steps:
- Log in to phpMyAdmin.
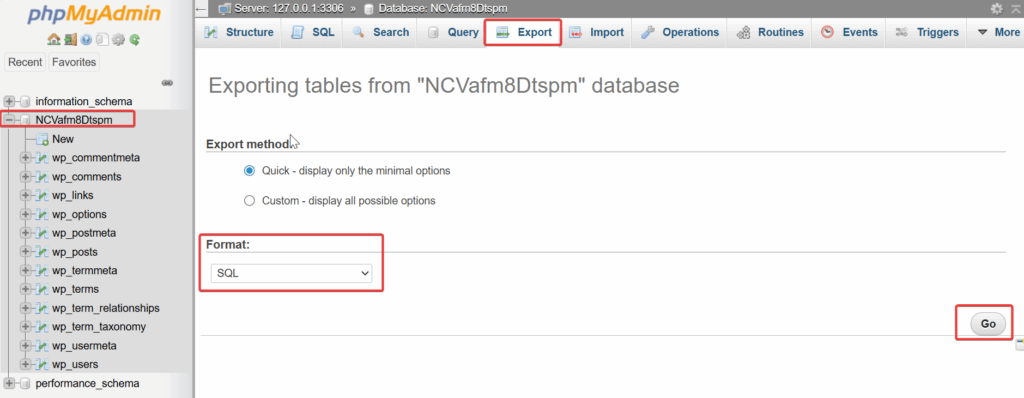
- In the left sidebar, select the database you want to export.
- Click the Export tab at the top.
- Choose the export method:
- Quick – recommended for most users.
- Custom – allows advanced options such as selecting specific tables or compression.
- Choose the format (usually SQL).
- Click Go to download the file.
2. How to Import a Database in phpMyAdmin
Importing allows you to upload a .sql file into an existing or new database.
Before you begin
- Ensure the database already exists (create one if needed).
- If the file is large, zip the sql file before uploading.
Steps:
- Log in to phpMyAdmin.
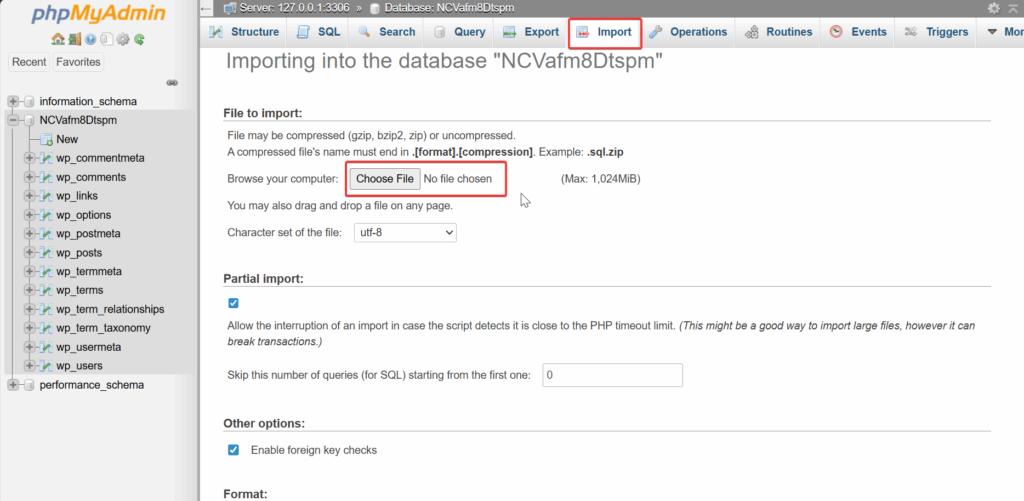
- Select the target database from the left sidebar.
- Click the Import tab.
- Under File to import, click Choose File and select your
.sqlfile. - Leave most settings at their defaults unless you have specific requirements.
- Click Go to begin the import.
If successful, you’ll see a confirmation message.
NB: Database with contents may be overwitten by the contents of the import
3. Running SQL Queries in phpMyAdmin
phpMyAdmin includes a built‑in SQL editor where you can run custom SQL commands.
Step-by-step
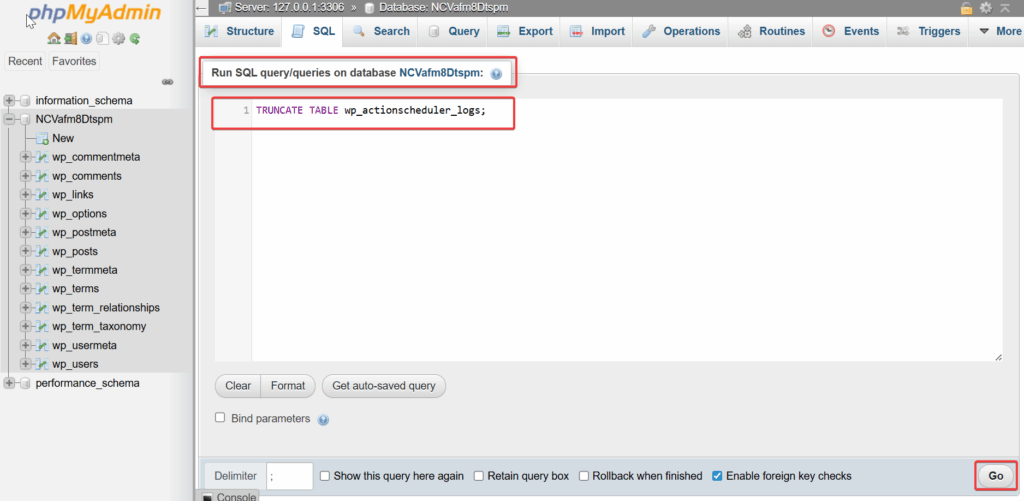
- Select the database you want to work with.
- Click the SQL tab at the top.
- In the SQL editor box, type or paste your SQL query.
- Click Go to execute it.
Examples of common SQL queries
Create a table:
sql
CREATE TABLE example (
    id INT AUTO_INCREMENT PRIMARY KEY,
    name VARCHAR(255),
    created_at TIMESTAMP DEFAULT CURRENT_TIMESTAMP
);
Update data:
sql
UPDATE users SET status = 'active' WHERE id = 1;
Delete data:
sql
DELETE FROM logs WHERE created_at < NOW() - INTERVAL 30 DAY;
Troubleshooting Tips
- Import errors such as “max upload size exceeded” may require increasing PHP limits (
upload_max_filesize,post_max_size) or using SSH/CLI instead. - Character encoding issues can be avoided by ensuring both export and import use the same collation (e.g.,
utf8mb4_general_ci). - Timeouts during import may require splitting large SQL files or importing via SSH mysql command.